IQ
Introduction
InventoryQuant (IQ) is an interactive web-application platform that can automatically transcribe and price an audio file upload or price an existing inventory spreadsheet list, exporting the results in a spreadsheet format.
IQ Terminology
- Customer: The entity/person that is paying for the IQ service.
- User: The individual that uses IQ and uploads files to be transcribed and/or priced.
- Client: The person or persons that has an insurance claim and needs their contents to be inventoried.
- Landing Page: The page where a person can create an account or sign in to an existing account.
- Dashboard: The functioning, operative page where a user selects and uploads a file, where processed files are downloaded, and the user can review specific processed flies and their processed files history.
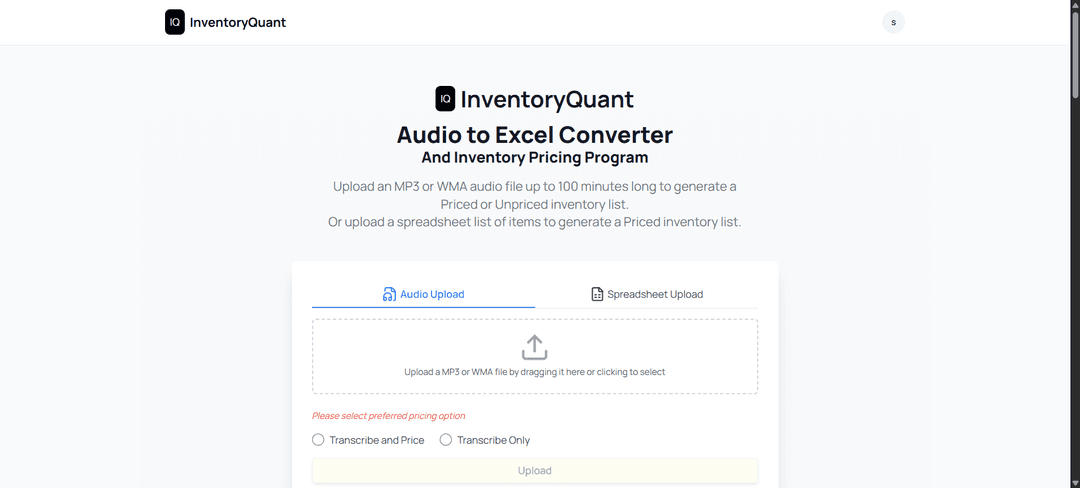
- Select a File Box: The section where the user can select a file, drag a file, or copy/paste a file to be uploaded before processing. Just above this box is where the user can choose the type of file they will be uploading (either an Audio file or a Spreadsheet file). Just below this box is where the user can choose the desired processing action (either to Transcribe and Price or to Transcribe Only). If the Spreadsheet Upload had been previously chosen, then only Pricing is available.
- Upload Button: The button located below the Select a File Box that the user clicks to upload and process the selected file.
- Processing a File: The automatic operation that occurs after the user clicks the upload button after uploading a file.
- Downloaded Processed File: The output produced after IQ processes the selected/uploaded file. In the following example, the processed file is named example_audio.mp3.
- Line Item: The specific inventory item (e.g. 1 book, 2 chairs, three hats, etc).
- Category: The classification or type of item (Furniture, Clothing, Food, etc).
- See Full Inventory Button: The button the user clicks on to view the inventory list (priced or unpriced) on the See Full Inventory page.
- See Full Inventory Page: The page where the user can add notes to each line item. If pricing is included in the processed file output, the user can also select different prices for the individual line items or use the price adjuster tool, located to the right of the price total, to adjust all of the prices together. Further instructions to follow for actions that can be performed on this page.
- Back to Dashboard Button: Clicking this button will return the user to the dashboard. This button is colored red and is located at the top left of the Select a File page.


Instructions For Using IQ
Step 1: Signing/Logging In

Click Sign In or Get Started


Sign In Page
Step 2: Account Creation/Email Verification (only needs to be done once)

Click Create an account

After creating an account, a verification email will be sent to the email address you used to create the account. Be sure to check your spam folder.

Click the Verify Email Address button in the email you received.

Clicking the verify button will direct you to this page. Click the Continue to dashboard button to access the Dashboard.
Step 3: Selecting a File
- After creating an account or signing into your existing account, you will be on the Dashboard page. This is where you can select and upload a file, where processed files are downloaded, and where you can review specific processed files and your processed file history.
- Below this you will find the Select a File box. This section is where you can select a file, drag a file, or copy/paste a file to be uploaded before processing.
- Audios can be up to 100 minutes long and up to 90 MB in size. Just above this box is where you choose the type of file you will be uploading (either an Audio Upload or a Spreadsheet Upload).
- After you select your file, that file name will appear just below the Select a File box.
- If you decide that your selected file is not the file you want to have processed, you can click on the trashcan icon to the right of the file name to delete it.
- Supported formats:
- Audio – .wma, .mp3, .m4a
- Spreadsheet – .xlsx only.
- Just below this box is where you choose the desired processing action (either to Transcribe and Price or to Transcribe Only).
If the Spreadsheet Upload has been chosen, then only the Pricing option is available and will occur automatically. - If the Spreadsheet Upload is selected, this means you would like to have an existing spreadsheet list of items priced. In order to have that pricing completed, the spreadsheet to be uploaded MUST be in the following format (the processed output spreadsheet will be in a different format which will be explained shortly):
You can download the spreadsheet formatting template here or by clicking the black Spreadsheet Formatting Template button on the dashboard.- All spreadsheet uploads need to have a header row with the following columns (not case sensitive): Location, Quantity or Qty, Description or Desc

- All spreadsheet uploads need to have a header row with the following columns (not case sensitive): Location, Quantity or Qty, Description or Desc


Step 4: Uploading a File
- Once you have selected your file to be processed, and you have selected a pricing option (if applicable), the upload button will change color to inform you that you're file is ready to be uploaded. Then, click on the Upload button to begin processing your selected file.
- Then, IQ will indicate below the Upload button that your file is being processed.
- You can only upload and process one file at a time. If you need to process multiple files, you must wait for the current file to complete processing before uploading the next file.
- The processing time for a large audio file and spreadsheet file with 1500+ line items can take up to 30 minutes.


Step 5: Processed Files
- Below the Select a File box, you will see all your processed files ordered by most recent.
- File metadata includes the File Name, File ID, Pricing Status, and Start and Finish Time.
- With each processed file, you can download the final spreadsheet, input audio and transcript (if applicable), and see the full inventory.
- Use the See Full Inventory button to explore details.

Step 6: Full Inventory Page
- After clicking the "See Full Inventory" button you will arrive at a page like the following.
- With this page, you can scroll through all of the line items. If there is a line item for which you want to leave yourself a note, reminder, or make a comment, then click on the Comment box on the left of that item. This comment will then show up later when you download the spreadsheet. A comment might include, “Review quantity” or “Get pricing assistance from client”.
- To the right of the Price Total at the top, there is a Price Adjuster slide. By moving this left or right, you can increase or decrease the prices for ALL of the line items at once. This slide has a range from 1 (low general pricing) to 20 (high general pricing). After changing the price adjuster you must click the Apply All button to apply your changes.
- The center two columns provide the Description (the original description uploaded) and the Link Description (the description that corresponds to the web link for the supporting documentation). These both will show up on the downloaded spreadsheet.
- Next to the Price is the Time Stamp column. This provides the time stamp from the audio that corresponds to each line item. This will allow you to quickly find that item on the audio of you need to review it.
- Next to the Time Stamp is the Link column. When you click on this, it will bring up the corresponding web link for the supporting documentation.
- Next to the Link is the Edit Price column (on the far right). When you click on this, you will see a drop down list of 20 web links with different prices. From this list you can select a different price/link if you want to find a different supporting document and price for that line item. You can review the different links and then click Select for the one you want to use. This will update that item’s price and also collapse the dropdown list. It will also automatically update the corresponding Link Description and the Price Total at the top of the list of items.
- At any time when you are on the Full Inventory Page, you can download the spreadsheet by clicking on the Spreadsheet icon near the top of the page or you can return to the Dashboard by clicking on the Back to Dashboard button at the top of the page.
- The above instructions for the Full Inventory Page (Transcribe and Price) are the same as for the Full Inventory Page (Transcribe Only) except there is no option to review or change prices or web links as these are not included in this file processing selection. selection.

Output Spreadsheet/Audio/Transcript
- Checkout this example spreadsheet and see the following descriptions of all the information in it.
- Age / Condition: Left empty for user to fill in.
- UNIT COST: Price per single item (e.g., one desk lamp).
- REPL COST: UNIT COST * QTY.
- MD State Tax: 6% applied to REPL COST.
- TOTAL: Final price after tax.
- PRICE SOURCE: Clickable reference link.
General Items
- At the very top right of the page, you can click on the circle icon with the first letter of your email address, and this will give you the option to Sign Out.
- If you encounter a delay in processing a file, try clicking on the Refresh button.
- If you encounter an error, please contact us at inventoryquant@gmail.com
